It’s just a little too long!
You’ve toiled on your grant day in and out for weeks on end, and despite chopping out loads of overly verbose text, it’s still over the length. It turns out that there are some built-in settings in MS Word to help you get below the length limit without removing additional text. This post is focused on NIH grant formatting but details here are relevant for most grants. This also assumes that you are already using narrow margins. I made up a 4 page ‘ipsum lorem’ document for this so I can give actual quantifications of what this does to document length.
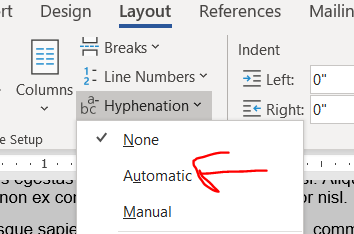
Hyphenation and justification
I only just learned about hyphens from Jason Buxbaum in this tweet. Hyphenation breaks longer words across lines with a hyphen in the style commonly used in novels. Hyphenation will get you a few lines in a 4 page document.
Justification makes words reach from the left to rightmost extremes of the margin, stretching or compressing the width of the spacing between words to make it fit. Justification’s effect on length is unpredictable. Sometimes it shortens a lot, sometimes it stays the same, sometimes it’s a smidge longer. In my 4 page ipsum lorem document, the length didn’t change. It’s worked to shorten some prior grants, so it’s worth giving a try. (Also, try combining justification with different fonts, see below.)
Here is the button to turn on justification.
Personally, I like ragged lines (“align left”) and not justified lines because I find justified text harder to read. I have colleagues who really like justification because it looks more orderly on a page. If you are going to use justification, please remember to apply it to the entirety of the text and not just a subset of paragraphs for the same reason that you don’t wear a tie with a polo shirt.
You can try combining hyphenation and justification, though I’m not sure it will gain anything. It didn’t in my demo document.
Modifying your size 11 font
Try Georgia, Palatino Linotype, or Helvetica fonts instead of Arial
The NIH guidelines specify size 11 Arial, Georgia, Helvetica, and Palatino Linotype fonts as acceptable options. (Note: Helvetica doesn’t come pre-installed on Windows. It’s pre-installed on Mac.) There were not major differences in length in my aligned-left ipsum lorem document between any of the fonts when the lines were aligned-left. But, try combining different fonts with justification. In the ipsum lorem document, justified Georgia was a couple of lines shorter than any other combinations of aligned-left/justification and NIH-approved fonts in Windows.
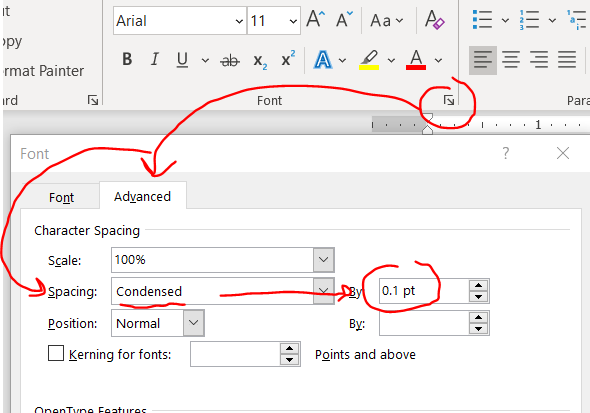
Condensing fonts
Kudos to Jason Buxbaum for this one. You can shrink the space between your letters without actually changing the font size/size of the letters. Highlight your text then home –> font little arrow –> advanced –> spacing becomes condensed then change the selecter menu to 0.1 pt.
This change will give you a few lines back in a 4 page document.
I can’t tell the difference in the letter spacing before and after using 0.1. If you increase to a number larger than 0.1, it might start looking weird, so don’t push it to far.
A word of advice with this feature: If you are too aggressive, you might run amok with NIH guidelines, which specify 15 characters per linear inch, so double check the character count in an inch (view –> ruler will allow you to manually check). FYI: all NIH-approved fonts are proportional fonts so narrow characters like lowercase L (“l”) take up less width than an uppercase W, and a random sample of text that happens to have a lot of narrow letters might have more than 15 characters/linear inch. You might need to sample a few inches to get a better idea of whether you or not are under the 15 character limit. (In contrast, Courier is a monospaced font and every character is exactly the same width.)
Adjust line and paragraph spacing
Both line and paragraph spacing affect the amount of white space on your page. Maintaining white space in your grant is crucial to improve its readability, so don’t squeeze it too much. In my opinion folks will notice shrunken paragraph spacing but not shrunken line spacing. So if you have to choose between modifying line or paragraph spacing, do line spacing first.
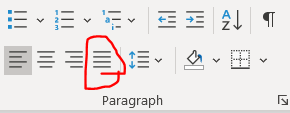
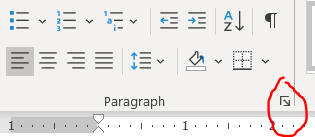
You can modify line and paragraph spacing by clicking this tiny checkbox under home tab –> “paragraph”.
Remember to highlight text before changing this (or if you are using MS Word’s excellent built-in Styles, just directly edit the style).
Line spacing
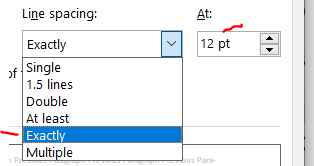
As long as you have 6 or fewer lines per vertical inch (view –> ruler will allow you to manually check), you are set by NIH guidelines. The default line spacing in MS Word is 1.08. Changing it to “single” will give you back about and eighth of a page in a 4 pg document. Today I learned that there’s ANOTHER option called “exactly” that will get you even more than a quarter of a page beyond single spacing. Exact spacing is my new favorite thing. Wow. Thanks to Michael McWilliams for sharing exact line spacing in this tweet. I wouldn’t go below “exactly” at 12 pt because that gets you at about 6.5 lines per inch, which goes against NIH standards of 6 lines per inch.
Paragraph spacing
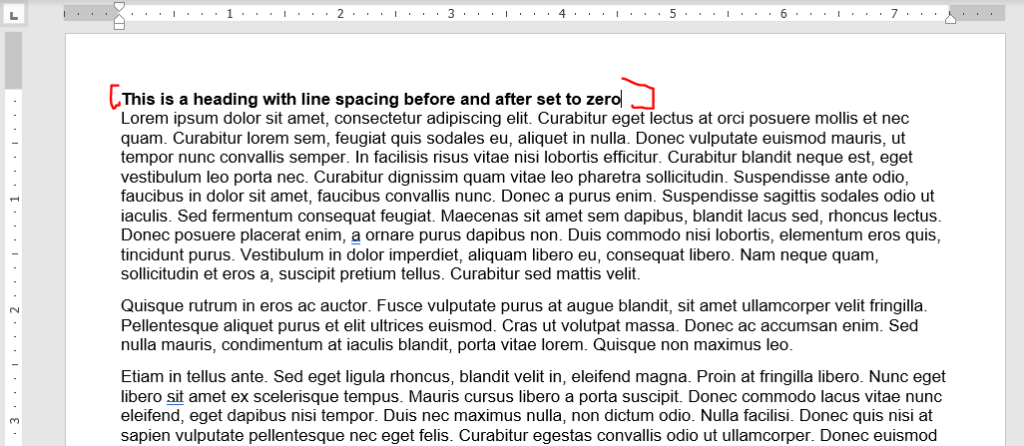
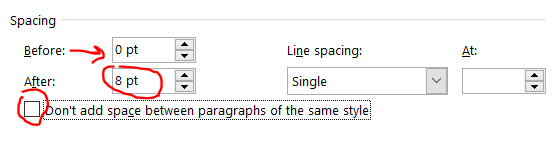
The default in MS Word is 0 points before and 8 points after the paragraph. I don’t see a need to have any gaps between a heading and the following paragraph, so set the line spacing before and after headings to be zero. Looks nice here, right?
Now you can tweak the spacing between paragraphs. I like leaving the before to zero and modifying the after. If you modify the before and not the after, you’ll re-introduce the space after the header. Also, leave the “don’t add space between paragraphs of the same style” box unchecked of you’ll have no spacing between most paragraphs.
Here’s the same document from above changing the after spacing from 8 to 6 points.
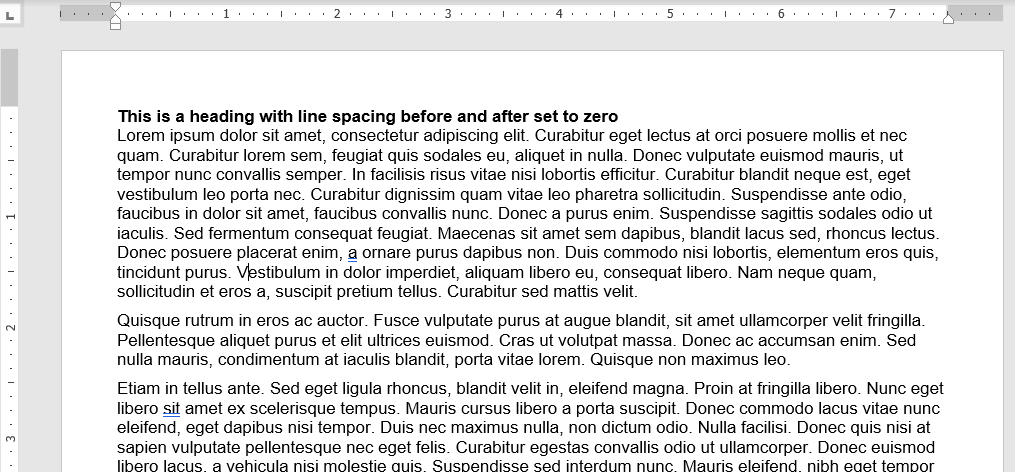
Looks about the same, right? This got us about 3 lines down on a 4 pg document. Don’t be too greedy here, if you go too far, it’ll look terrible (unless you also indent the first line, but then you run the risk of it looking like a high school essay).
Play around with modifying both paragraph and line spacing. Again, I recommend tweaking line spacing before fiddling with paragraph spacing.
Window/orphan control, or how to make paragraphs break at the maximum page length
MS Word tries to keep paragraphs together if a small piece of it extends across pages. For example, if the first line of a paragraph is on page 2 and the rest of the paragraph is on page 3, it’ll bring that first line so that it ALSO starts on page 3, leaving valuable space unused on page 2. This is called window/orphan control, and it’s easy to disable. Highlight your text and shut it off under home –> paragraph tiny arrow –> line and page breaks then uncheck the window/orphan control button.
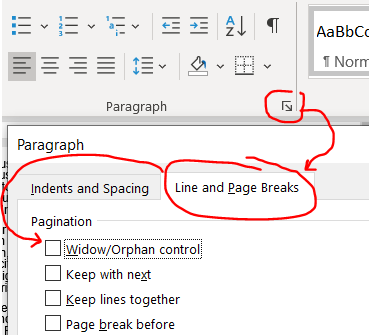
This gives a couple of lines back in our 4 page document.
Modifying the format of embedded tables of figures
Tables and figures can take up some serious real estate! You might want to nudge a figure or table out of the margin bounds, but that will get you in some serious trouble with the NIH — Stay inside the margins! Try these strategies instead.
Note: I have a separate post that goes in-depth into optimizing tables in MS word and PPT, here. Check it out if you are struggling with general formatting issues for tables.
Wrap text around your tables or figures
Note: In 3/2024, I discovered a better way to get tables and figures to behave that is described at the end of this section. I’m keeping the older pieces here since I think they are still relevant.
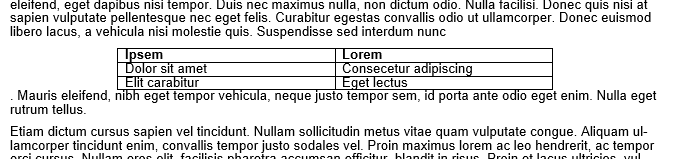
Consider reclaiming some unused real estate by wrapping the text around tables or figures. Be warned! Wrapping text unearths the demons of MS Word formatting. For this example, we’ll focus on just wrapping text around a table to make a ‘floating table’. Below is an example of a table without text wrapping.
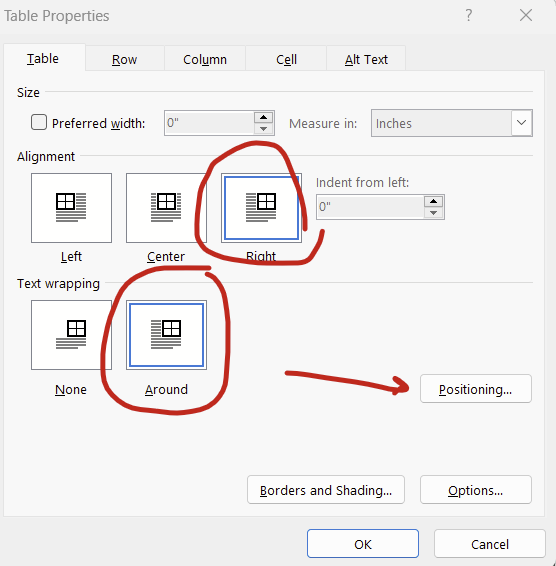
Right click on your table and select “Table Properties” then click right or left alignment and set text wrapping to around. (For figures, right click your figure and click “size and position”, which is analogous to the table options. For simplicity, I’ll focus on tables only here.).
Adjust your row width a bit and now you have a nice compact table! But wait, what’s this? The table decided to insert itself between a word and a period! That’s not good.
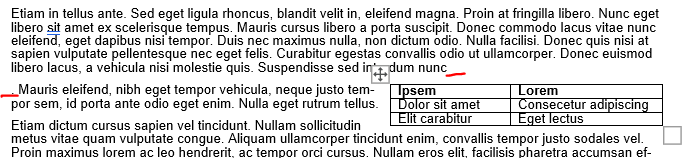
When MS Word wraps text around a table, it decides the placement of the now floating table by inserting an invisible anchor followed by a line break. Here, there’s an invisible anchor is placed between “nunc” and the period. Your instinct will be to move the table to fix this problem, and that is the wrong thing to do. Avoid moving the table because the anchor will do unpredictable things to your document’s formatting. This is so well known to create havoc that it led to a viral Tumblr post from user laurelhach:
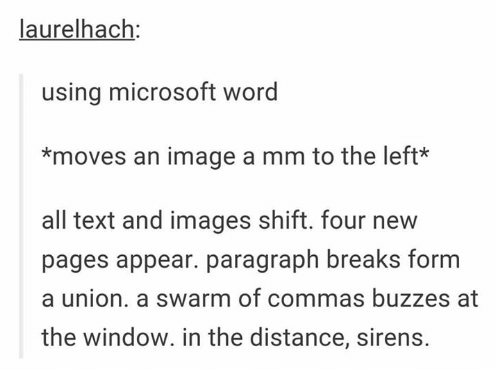
Moving tables is pointless in MS word because it doesn’t do what you think it does and you will be sad. Move the text instead. Here, highlight that stray period and the rest of the paragraph starting with “Mauris eleifend” and move it where that weird line break occurred after “nunc”.
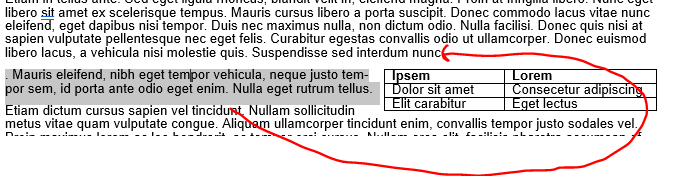
There will be a new line break to erase, but the table should now follow the entire paragraph.
If you are hopelessly lost in fighting the MS Word Floating Table Anchor Demon, and the table decides that it doesn’t want to move ever or is shifted way to the right (so much so that it’s sitting off screen on the right), then the invisible anchor might be sitting to the right of the final word in a heading or paragraph. I recommend reverting the floating table to a non-text wrapped table to figure out what’s wrong and fix everything. Right-click the table and open up the “table properties” option again and change the text wrapping to “none”. The table will appear where the invisible anchor is and now you can shift around the text a bit to get it away from the end of a sentence. Now turn back on text wrapping. This usually fixes everything.
Note: I actually made the table intentionally insert between ‘nunc” and the period for this example. This was just a re-enactment so it’s not MS Word’s fault — this time. BUT this really happens. It’s very problematic if you have >1 table or figure on a page because the Floating Table Anchor Demons will fight with each other and your grant’s formatting will pay.
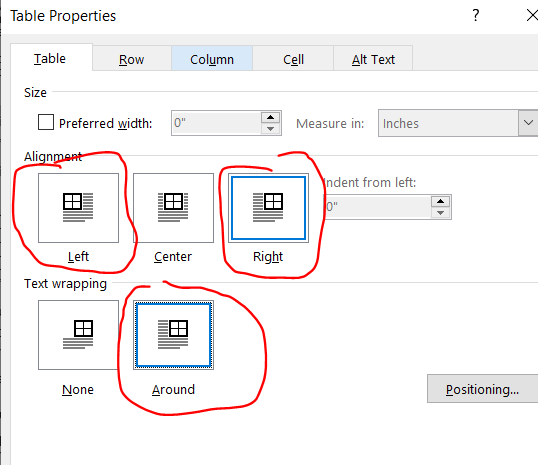
Update 3/2024: There’s actually a simpler way to fight the demons of embedded tables and figures: Setting the position relative to the margin. Setting relative to the margin not only makes anchors disappear, it also ensures that your figures don’t extend outside of the margin. We’ve all heard horror stories about grants being rejected because some table or figure snuck beyond the margin limits.
To set the positioning of your table or figure relative to the margin, right click on your table/figure and select “table properties”, set alignment to “right” (or center or left) and text wrapping to “around” then hit the “positioning” button:
You can then set the horizontal and vertical position relative to the margin rather than the paragraph. Then the anchors go away completely! You can set it all the way to the extremes (left/right, top/bottom) or put in a measurement (eg replacing “bottom” with “5 in” in the vertical “position” box will put your figure or table about 2/3rds of the way down a page).
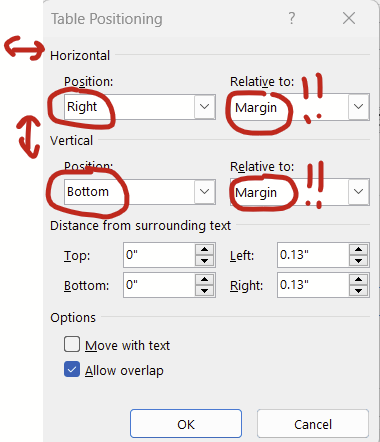
Tables and figures behave much better when you set the positioning relative to the margin.
Changing cell padding *around* your tables and figures
Continuing with the window above (right click table –> table properties –> position), there’s this “distance from the surrounding text” section at the bottom that changes how much white space padding there is around the table/figure. The default padding is 0.13 inches, which I think is a bit too generous. Try changing this to 0.08 inches and you might get to squeeze in a few extra words in the surrounding text before a new line break.
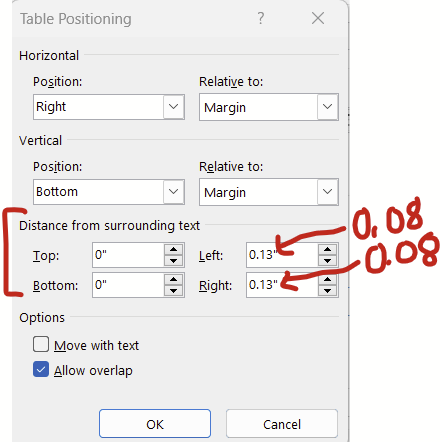
For figures, there’s an analogous series of options that you can get to by right clicking your figure –> size and position. Under “size and position”, set the wrapping to “tight” and then have at it.
Reduce cell padding *inside* your tables
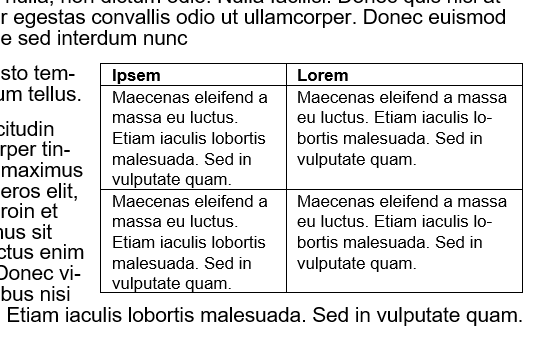
This is especially helpful for tables with lots of cells. Reducing the cell padding shrinks the white space between the text in a cell and borders of the tables. In contrast with the “save the whitespace” principle of lines and paragraph spacing, I personally think that less white space in tables improves readability. Here’s before, with default cell margins of 0.08:
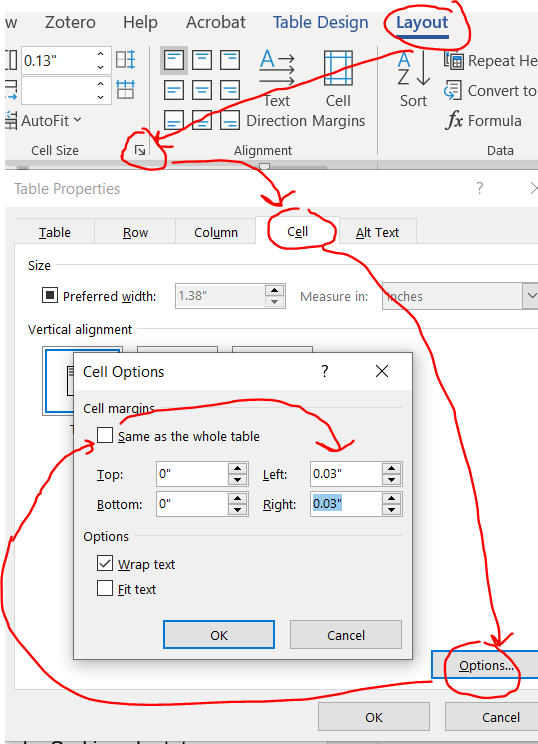
Highlight your entire table and you’ll notice a new contextual ribbon with “design” and “layout” tabs appear. Click layout –> cell size little arrow –> cell –> options –> uncheck the box next to same size as the whole table then reduce the cell margins.
Here’s that same table reduced with cell margins reduced from 0.08 to 0.03.
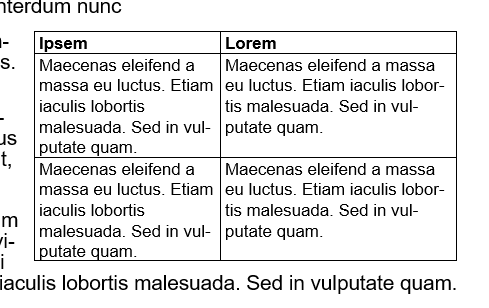
Now you can strategically adjust the column size to get back some space.
Also note that you can also apply justification and adjust the line and paragraph spacing within your tables, which might also help shrink these things down a bit.
Shrink the font in your tables
AFAIK, NIH guidelines don’t specify a font size to use in tables, just something that can be read. I typically use size 8 or 9 font.
Did I miss anything?
If I did, shoot me an email at timothy.plante@uvm.edu!