Note: this post was written prior to Stata 17, which now allows Python to control Stata and vice versa. In Stata 16, Python could not control Stata but Stata could control Python. Because of this functionality, there’s a more streamlined approach to getting Jupyter to play nicely with Stata 17, detailed here. You’ll still need to install Python and Jupyter, so this post is still helpful.
Stata 16 now integrates with Python. I’m pretty stoked about using some of the Python figure packages. Getting it up and running has been a bit of a challenge. Here’s how I got it to work.
Of note, since I started this post, Stata’s blog has started a series on using Python, which you should check out here.
Install part 1:
Installing Anaconda (free for individuals, not for institutions)
Anaconda comes with many built-in statistical packages. The (free) individual version of Anaconda from here. Just make sure to check the “set as path” button during the Anaconda install!
Installing the (universally free) traditional Python distribution
As of July 2020, Python apparently has two versions that are commonly used, the 2.x version and the 3.x version. The end-of-life of 2.x versions is this year, so I wouldn’t recommend using it (current highest version is 2.7). Instead, use the 3.x version, currently the 3.8 version. You can find it at the Windows Python Download Page.
Make sure to install the version matching your Stata install! Stata comes as 32 bit or 64 bit. In Stata, type –about– to see what version you have. You’ll see that mine is running the 64-bit version of Stata. If you have a relatively modern computer, you are probably running the 64-bit version of Stata. Windows can actually run either 32-bit or 64-bit versions if you have a 64-bit processor, so do yourself a favor and just check. Type -about- in Stata to confirm your version.
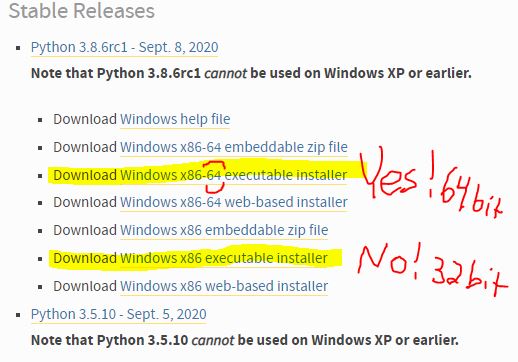
Make sure that you install the corresponding version of Python. The highlighted one (x86-64) is the 64 bit. The other one (x86) is the 32-bit version. For this example, since I have the 64-bit version of stata, I installed the x86-64, 64-bit version of Python.
I had originally installed the 32-bit version of Python and Stata couldn’t load it. Installing the 64-bit version of Python solved that. There’s actually a big “download now” button on the main Python webpage that will give you the 32-bit version. Make sure to select the specific stable release in the picture above.
For the love of Pete, check this PATH box when you install it.
PATH is a list of commands that can be run from the Windows command line, and where their relative program exists.
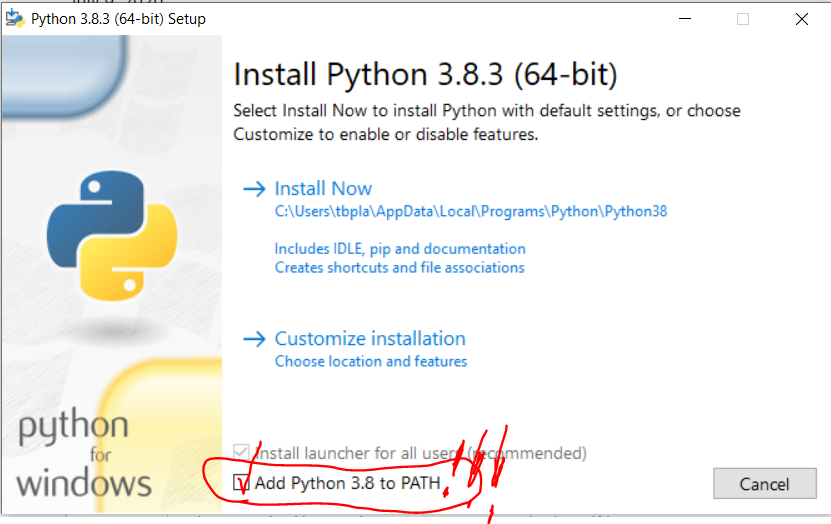
See this check box right here? Select it. If you don’t, you’ll have a heck of a time getting anything to run from the command line. This should be checked on default, I have no idea why it’s not. If you forgot to check this box, uninstall Python and reinstall it after checking this box.
Also, notice that it says “64 bit” on the installer screen above. If it says “32 bit”, you probably downloaded the wrong version. Go back and try again!
What the heck did I just install?
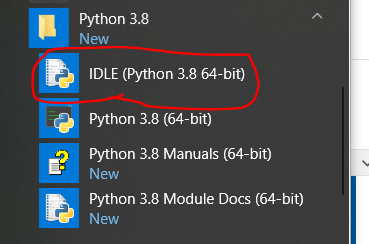
There are two Python shell apps/programs that came along with the default Python setup. IDLE is a more user-friendly Python shell. It resembles the command line in Stata, but it has the syntax highlighting of the Do file editor.
The app called “Python 3.8 (64-bit)” is the shell without any markup. If you want to play around with Python, I recommend using IDLE.
Making your first program in IDLE
Anything you run in Python should be from a script, or a *.py file. Pop one open from within IDLE by hitting Ctrl+N. Enter the following:
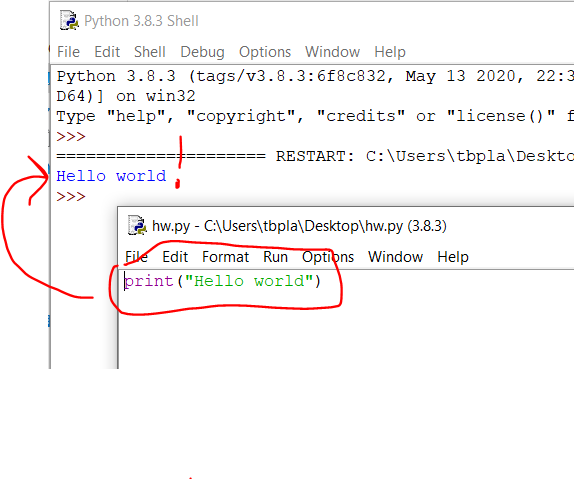
print("Hello world!")Then save it and run it (by pressing F5) and you’ll get the hello world!
How does that look in Stata?
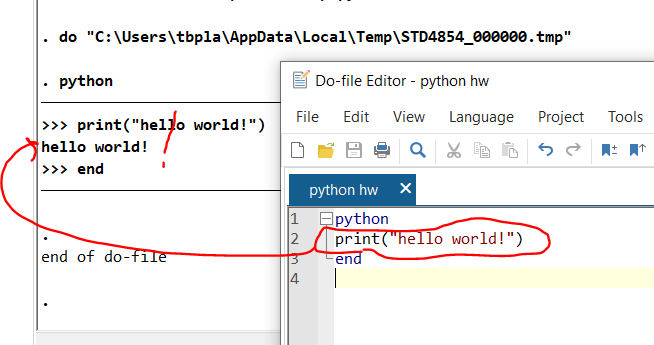
Let’s do the same thing in a Stata do file. In order to open up the Python shell within Stata, you have to type –python– on its own line, your intended python code, then –end– on its own line. Here, I have entered:
python
print("hello world!")
end
Then just hit ctrl+d or the run button to get it to work in Stata!
Install Part 2: How do I get the Pandas, Matplotlib, SciPy, Sklearn, and NumPy libraries installed in Python?
Note: Anaconda comes with all of these except sklearn. For below, just complete the sklearn step.
Python by itself can do some stuff, but the heavy lifting for stats and visualization is from add-in libraries that aren’t included with the default Python and must be added in before doing much of anything else. (Note: Anaconda does come with those and is a Python installation geared towards science, but we’re doing the classic install here.) Installing these additional libraries can be done with the included pip library, which automates all downloads and installations. BUT pip it has to be called from the Windows command line, not in a Python shell (i.e., not in IDLE). You’ll know you’re in the shell if the line starts with this:
>>>
So if you type “pip install pandas” in the shell (after the “>>>”), you’ll get an error and you will not be getting pandas.
To pop up the Windows command line, hit the Start button then type “cmd” to open it up. Or hit windows key+r and type “cmd” to open it up. If you correctly checked the PATH checkbox in the install, you should get the version reported if you type the following in:
python --version
If you get some sort of error, it’s probably because you didn’t check the PATH box during the install. Uninstall Python then reinstall it and make for sure you check that stupid PATH box.
A note about the Windows 10 command line: If you type “Python” and hit enter, Windows pops up the Windows store and tries to get you to install the version of Python that they host. This is by far the dumbest Windows feature ever, and I have seen BOB. So, avoid ever typing the word “python” in the command line. Instead, use the handy “py” command, which does everything you’ll need it to do. Py is the python launcher.
To call pip, you want to type in “py” then “-m” then “pip” and its commands. the “-m” allows you to run library commands as a script. If it’s been a while since you updated pip, now’s a good time to update it in the command line to show how to call pip:
py -m pip install --upgrade pipNow let’s install the core packages for Python:
py -m pip install pandas
py -m pip install matplotlib
py -m pip install numpy
py -m pip install scipy
py -m pip install sklearn
You’ll see a screen like this, and it’ll let
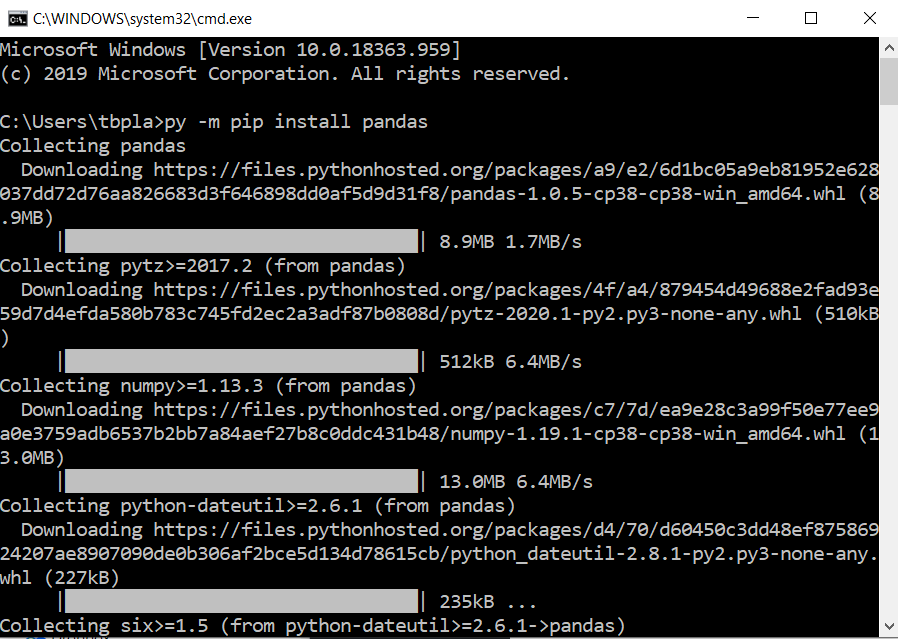
You only need to do this installation step once.
How do I use Pandas, Matplotlib, NumPy, Scikit-learn (sklearn), and SciPy in Stata?
Once the libraries are installed, you can then integrate them into your scripts. Each time you want to use them, you need to import them so you can call them. The convention is to import these using common so you don’t have to type “pandas” over and over again, you can just use “pd”. Ditto for other libraries:
python
import pandas as pd
import matplotlib.pyplot as plt
import numpy as np
import scipy as sp
import sklearn as sk
end
Install part 3: How do I install Jupyter Lab and get it to work with Stata? (This is the updated version of Jupyter Notebook)
Note: Jupyter lab comes installed with Anaconda, but node.js, npm, and stata_kernel still must be installed.
Jupyter is a super popular way to cleanly complete analyses. Its origins were in Python, but it now works in R and Stata. Details on installing Jupyter are here. Specific instructions for getting it to interface with Stata are here. Here’s how I got it installed:
First: install node.js (warning: this takes a long time and requires a reboot)
Make sure that you have the current version of Python installed! Node.js will install the current version and if your version is outdated, it’ll create a huge headache.
First, install node.js. Download here. I checked the box in the node.js install to also install additional software. At the end of the install, it pops open Windows powershell window and installed a bunch of stuff, including Python if you do not have the current version. It also installs Chocolatey and a few other things. NOW STOP HERE AND REBOOT YOUR COMPUTER. Come back when it restarts.
Next: install other npm, jupyterlab, and Stata plugins (warning: this also takes a while)
First, it’s always good habit to make sure you have the newest version of pip!
py -m pip install --upgrade pipThen, type the following in the Windows command line:
py -m pip install npm
py -m pip install jupyterlab
py -m pip install stata_kernel
py -m stata_kernel.install
jupyter labextension install jupyterlab-stata-highlight
When later trying to run jupyter lab, I got an error saying “Exception: Jupyter command jupyter-lab not found.” I updated pip then uninstalled and reinstalled npm, jupyterlab, and stata_kernel (just replace the word “install” with “uninstall” above) then installed everything again. This fixed things.
Finally, you need to do a last step described under “windows specific steps” here to get this to work in Windows. I found my Stata executable at “C:\Program Files\Stata16\StataSE-64.exe”, not Program Files (x86). You can delete the new Stata desktop shortcut once you run it as an administrator one time.
You might also need to configure Jupyter to work with your Stata install. Details are here. I found the configuration file named .stata_kernel.conf sitting in this folder: C:\Users\MYUSERNAME\.stata_kernel.conf
In reviewing the configuration file, it seems to have correctly identified my Stata SE 16 setup. I changed the graph format from svg to png, but left the rest unchanged.
Now that I have Jupyter Lab installed, how do I open and use it?
In Anaconda Navigator, just click the “Jupyter lab” button. For a traditional Python install, open the Windows command line, type:
jupyter labIt should open up your web browser to a Jupyter page. Keep the Windows Command line terminal open in the background. If you close it, Jupyter will cease to work. (Note: This isn’t true for anaconda if you open Jupyter from the GUI.) Click the “Stata” notebook button to start.

It’ll open up a scripting page for your code. At the bottom it should say “stata idle”. That’s how you know you set it up correctly.

Now you can use traditional Stata code!
There are additional programs called “Magics” detailed here that help Stata integrate more seamlessly with Jupyter. Each of these commands begins with a % symbol. There are specific ways to modify these commands.
- %browse – lists the first 200 rows
- %head – first 10 rows
- %tail – last 10 rows
- %set – can change the graph_format, graph_scale, graph_width, and graph_height
How do I use SFI to interface Stata and Python?
Stata and Python talk to each other using the Stata function interface, or SFI. MORE TO COME ON THIS.
