Auto Reply (Out of Office) Mode for Outlook Mail

Away from the office for awhile? Take these steps to put your email into Auto-Reply mode.

(The following instructions are for the Windows version of Outlook, but if you prefer, see these instructions for the web version).

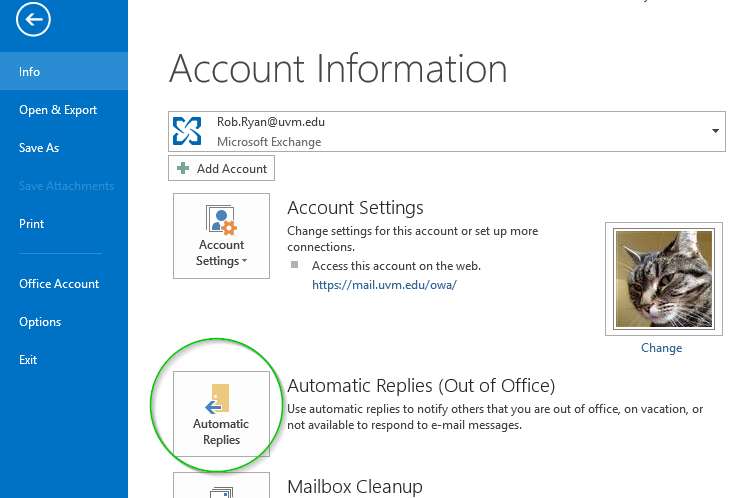
  1. In Outlook, click the File menu to display the Account Information page.
  2. Select “Automatic Replies”.
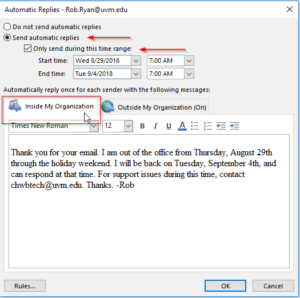
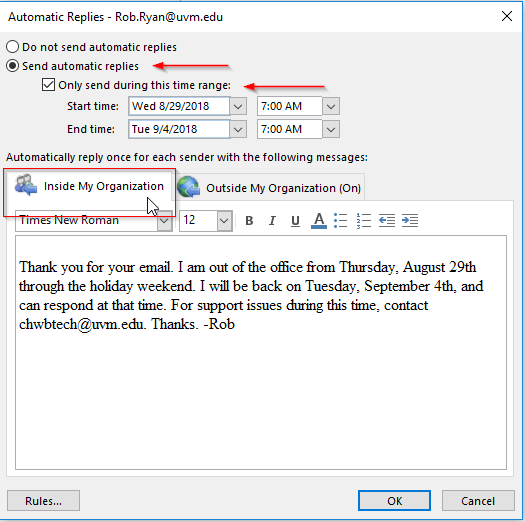
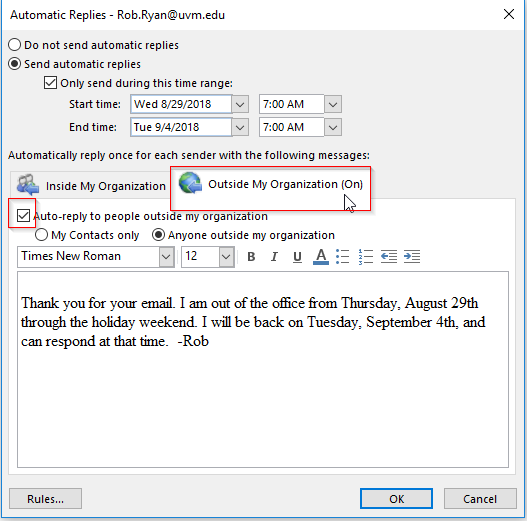
  3. In the pop-up window, select the “Send automatic replies” bubble and check the “Only send during this time range” box. In the fields below, set the duration of your Auto Reply message.
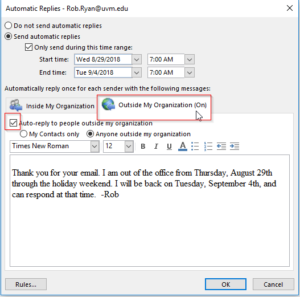
  4. Include an auto-reply message for people inside of UVM and (optionally) people outside of UVM too. If you choose the latter option, be sure to copy and paste your out-of-office message, or some variation of it, into the “Outside My Organization” tab too. Click OK.


Posted in Email, Tips and Tricks | Leave a comment

How to Change Your NetID Password

Your NetID and password are used to access a lot of sensitive information at UVM. To change your password, go to:

https://www.uvm.edu/account

Passwords must be at least 12 characters long, contain at least 2 types of characters (lowercase, uppercase, numbers, or symbols), and not be based on dictionary words. Never share your password!

Password Tips:

A good password is easily remembered but hard to guess:

  • Nonsense words, unusual acronyms, and deliberate misspellings help make good passwords. Do not choose passwords that have a personal reference to yourself, such as your nickname or a family member’s name.
  • Pick a sentence you remember from a movie, book, or song. Use the first letter of each word, tossing in some capitalization and punctuation to make it harder for someone else to guess.
  • You can include dictionary words if your password is long enough. Use several words — or even a whole sentence — as well as numbers or punctuation.
Posted in Email, Tips and Tricks, Windows | Leave a comment

Outlook Email and Calendar: A First Timer’s Guide

This describes what to expect the first time you run Outlook 2016 on a CHWB Windows computer. For access from your own computer at home we recommend Outlook Web Access (OWA).

STEP 1: Double-click the Outlook 2016 icon to start it up. The icon will be on your desktop or Start menu.

STEP 2: Read the Welcome screen and click Next.

Welcome to Outlook

STEP 3: in the Add an Email Account screen, make sure “Yes” is selected (it’s the default) and click Next.

Add an Email Account

STEP 4: the Auto Account Setup screen will automatically fill in your name and email address. Click Next.

Email Auto Account Setup Screen

STEP 5: Outlook will complete the setup for your email account. Once it is fully configured (three green checkmarks), go ahead and click the Finish button. You’re done!

Email Configuring Screen

You might also be interested in this article: Add An Email Signature

Posted in Email | Leave a comment